
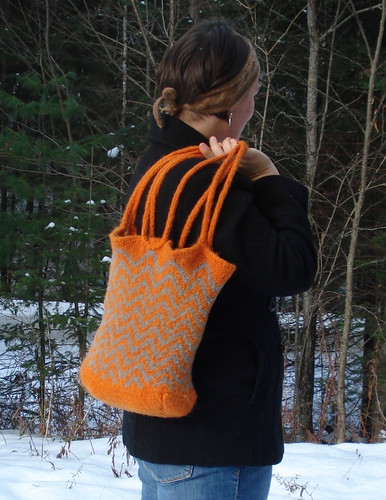
(This being the 1st time I've intentionally felted anything, it must have had some beginner's luck because I think it came out swell).
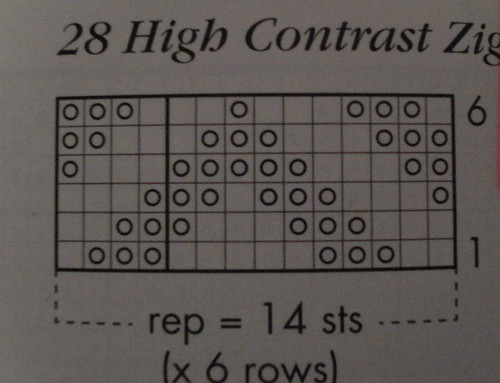
Note: I took the high contrast 14 stitch zig-zag chart from Kaffe Fassett's Pattern Library, and I'm sure he must have gotten it somewhere. It hardly seems copywritable, since it's so simple. Here's a snapshot of the chart.
Ok: before felting, 15 1/2" wide, 18" tall. After 15 minutes in the washing machine: 10 1/2" wide, 15" tall.
Yarn: Brown Sheep Lamb's Pride Worsted, 1 skein silver, 1 1/2 skeins orange
MC: orange
CC: silver
With MC, loosely CO 140 sts, knit one round. Join CC and pm, then follow chart. Knit 10 repeats of the pattern, and using your brain, finish the last CC triangle without making a new one start, i.e., use MC across each pattern repeat, slowly phasing out the top of your CC triangle. Once CC is completely phased out and those zigzags are no more, knit one round MC, then knit another round MC decreasing every 10 sts or so. Doesn't matter, but this is to keep the bag from flaring out more than is attractive and functional. Knit one more round, purl one round, knit one round, and cast off using k2tog, slip back onto L needle, k2tog, etc.
Pick up the 140 sts at the bottom of your bag (the cast on edge) and k20, pm, k50, pm, k20, pm, k50, pm. Miter the corners by k2tog before each marker and ssk after each marker, until no more sts are left on the sides. I used the 3 needle bind off for the bottom of the bag: since it's going to be felted, you won't see that seam. You can mattress it if you want to.
Straps:
Side one: Pick up 4 sts a few inches in from the side of the bag, i-cord for quite some time (sorry, I forgot to measure, but make them about twice as tall as the bag), attach to the same place at the other end of that side (make it symmetrical). Repeat for the other side of the bag.
Washed on hot/cold, heavy duty, smallest load with one pair of jeans. It was felted just fine after about 15 minutes. Stuff with towels, shape, and let dry.
After felting, you'll have these terrifically long straps, so you can do as I did or get creative: I grabbed one of those long straps and twisted it around and down, essentially doubling it. Then using MC yarn and a Chibi needle, I whip-stitched the center of the middle loop to the top of the bag. Repeat for each side. (illustration coming soon to remedy that horribly inadequate description). Wrap the top loops up on each side so that you don't have zillions of handles to deal with.

1 comment:
Hey buddy Tat bag is superab!!!U r doing gr8 job, Thanks for sharing with us..
keep up the work.
www.lifeinfozone.com/category/clothing-accessories/
Post a Comment